 vue-cli+webpack搭建项目
# vue-cli+webpack搭建项目
vue-cli官方文档 (opens new window)
# 初始化项目
vue -V // 查看vue-cli版本,否则执行一下命令
npm install @vue/cli -g // 安装vue-cli3+;安装成功查看版本号是否是3.x.x或4.x.x,是则正常,否则:可能是node版本太低,切换node版本到8+以上.
vue create vue-cli-project // 新建vue-cli项目
// 模式选择:Manually select features,自定义模式;之后是自定义的一些配置,视项目具体情况选择~
// 插件选择:Babel、Router、Vuex、CSS Pre-processors、Linter/Formatter、Unit Testing
// 路由选择:Use history mode for router? (Requires proper server setup for index fallback in production) (Y/n) :y
// css预处理选择:Pick a CSS pre-processor (PostCSS, Autoprefixer and CSS Modules are supported by default) :Less
// 代码规范(ellint配置)选择:Pick a linter / formatter config :ESLint + Prettier
// 选择什么时候进行eslint校验:Pick additional lint features :Lint on save、Lint and fix on commit(保存和提交时都校验)
// 选择测试框架:Pick a unit testing solution   :Jest
// 配置保存位置:Where do you prefer placing config for Babel, ESLint, etc.?     :In dedicated config files(放在单独的文件里面)
// 是否保存配置:Save this as a preset for future projects?    :y(保存之后,下次可直接用这份配置)
// 若上一步选择y,则需设置配置文件名称:Save preset as: (vue-cli-setting);
// 最后enter等待安装完成~
# 第一次运行项目
安装完成,生成如下目录结构的文件~
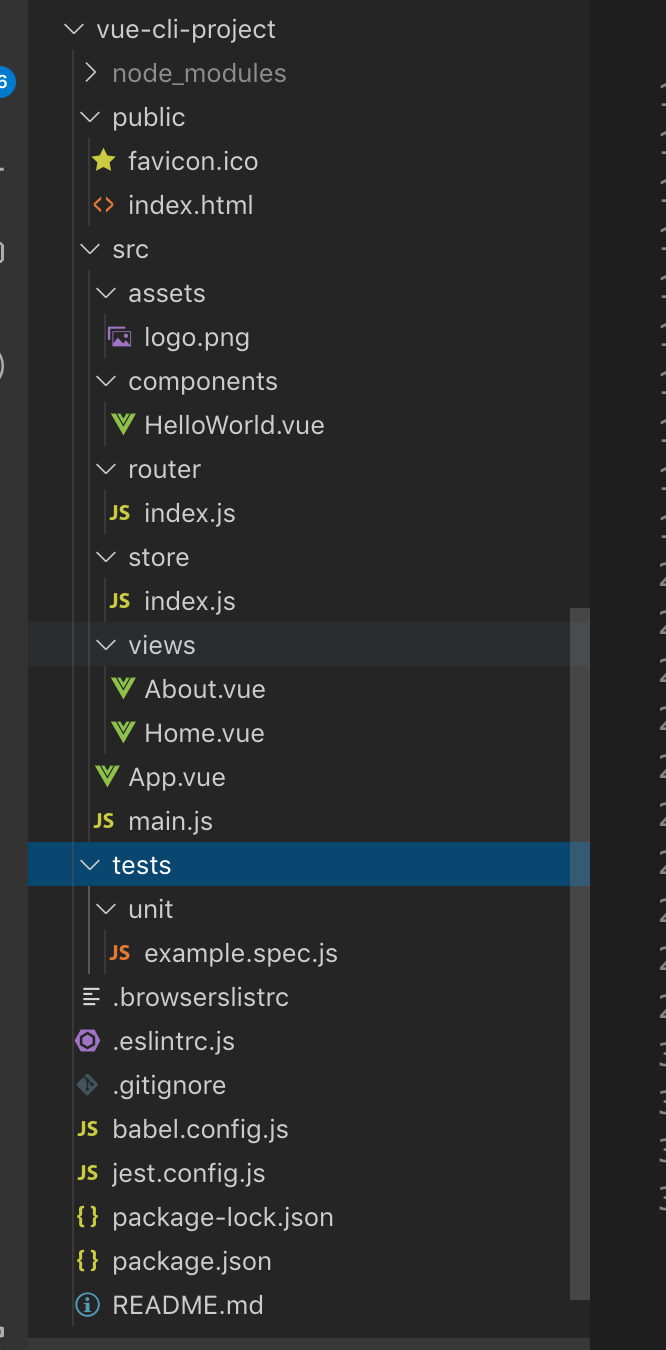
cd vue-cli-project
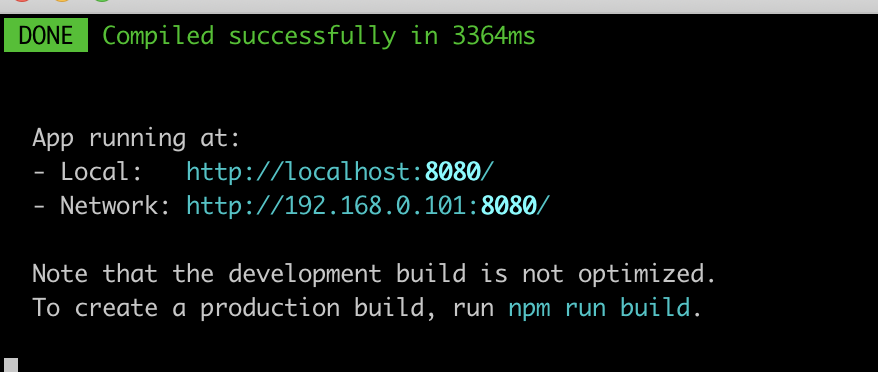
npm run serve // 本地运行一下项目,正常情况下回出现以下提示,直接在浏览器输入链接即可访问~
# 配置全局环境变量
- 在根目录下新建
.env.dev/.env.prod等文件; 模式和环境变量 (opens new window)
只有以
VUE_APP开头的变量会被webpack.DefinePlugin静态嵌入到客户端侧的包中,代码中可以通过process.env.VUE_APP_XXX访问NODE_ENV和BASE_URL是两个特殊变量,在代码中始终可用
// .env.dev
NODE_ENV = 'development'
VUE_APP_ENV = 'dev'
BASE_URL = './'
VUE_APP_PUBLIC_PATH = './'
VUE_APP_API = 'https://www.baidu.com'

// .env.mock
NODE_ENV = 'development'
VUE_APP_ENV = 'mock'
BASE_URL = './'
VUE_APP_PUBLIC_PATH = './'
VUE_APP_API = 'https://www.baidu.com'

// .env.analyze
NODE_ENV = 'production'
VUE_APP_ENV = 'analyze'
BASE_URL = './'
VUE_APP_PUBLIC_PATH = './'
VUE_APP_API = 'https://www.baidu.com'

// .env.prod
NODE_ENV = 'production'
VUE_APP_ENV = 'prod'
BASE_URL = './'
VUE_APP_PUBLIC_PATH = './'
VUE_APP_API = 'https://www.baidu.com'
package.json中修改命令
"scripts": {
    "mock": "vue-cli-service serve --mode mock",
    "dev": "vue-cli-service serve --mode dev",
    "prod": "vue-cli-service build --mode prod",
    "analyze": "vue-cli-service build --mode analyze",
}
# 配置vue.config.js
- 项目根目录下新建
vue.config.js文件, vue.config.js (opens new window)
// vue.config.js

const path = require('path')
const IS_PROD = process.env.NODE_ENV === 'production'

const resolve = dir => path.join(__dirname, dir)
const utils =require('./utils');


module.exports = {
  publicPath: IS_PROD ? process.env.VUE_APP_PUBLIC_PATH : '/', // 默认'/',部署应用包时的基本 URL

  // outputDir: process.env.outputDir || 'dist', // 默认dist, 生产环境构建文件的目录

  assetsDir: "static", // 相对于outputDir的静态资源(js、css、img、fonts)目录

  // indexPath: 'index.html', // 指定生成的 index.html 的输出路径 (相对于 outputDir); 默认index.html

  // pages: utils.entries(), // 构建多页面应用,每个“page”应该有一个对应的 JavaScript 入口文件

  // linOnSave: false, // 默认true;是否在开发环境下通过 eslint-loader 在每次保存时 lint 代码。这个值会在 @vue/cli-plugin-eslint 被安装之后生效。

  devServer: process.env.VUE_APP_ENV === 'mock' ? {
    proxy: { // proxy配置
      '/mock': {
        'target': 'http://60.205.222.230:3000/mock/',
        'pathRewrite': {
          '^/mock': ''
        }
      }
    }
  } : {},

  css: {
    loaderOptions: { // // 向预处理器 Loader 传递选项
      less: {
        javascriptEnabled: true
      }
      // postcss: {
      //   // 这里的选项会传递给 postcss-loader
      // }
    }
  },
  configureWebpack: () => ({// 该对象将会被 webpack-merge 合并入最终的 webpack 配置,允许我们更细粒度的控制其内部配置。
    // devtool: 'source-map',
    resolve: {
      alias: { // 设置目录别名alias
        '@': resolve('src'),
        'vue$': 'vue/dist/vue.esm.js'
      }
    }
  }),
  chainWebpack: config => {

    /////压缩图片 安装:npm i image-webpack-loader -D
    // config.module
    //   .rule('images')
    //   .use('image-webpack-loader')
    //   .loader('image-webpack-loader')
    //   .options({
    //     mozjpeg: {
    //       progressive: false,
    //       quality: 80
    //     },
    //     // optipng.enabled: false will disable optipng
    //     optipng: {
    //       enabled: false
    //     },
    //     pngquant: {
    //       quality: '65-90',
    //       speed: 4
    //     },
    //     gifsicle: {
    //       interlaced: false
    //     },
    //     webp: { quality: 75 }
    //   }).end()

      /////////
      // npm install svg-sprite-loader -D,下载打包雪碧图插件
      const rule = config.module.rule('svg')
      rule.exclude.add(path.resolve('./src/assets/icons/svg'))
      const svgRule = config.module.rule('auto-svg') // 找到svg-loader
      svgRule.uses.clear() // 清除已有的loader, 如果不这样做会添加在此loader之后
      svgRule
        .test(/\.(svg)(\?.*)?$/)
        .exclude
        .add(/node_modules/) // 正则匹配排除node_modules目录
        .end()
        .use('svg-sprite-loader')
        .loader('svg-sprite-loader')
        .options({
          symbolId: 'icon-[name]'
        })
      ////////

      //////// 打包分析 npm i webpack-bundle-analyzer -D
      if (process.env.VUE_APP_ENV === 'analyze') {
        const {BundleAnalyzerPlugin} = require('webpack-bundle-analyzer')
        config.plugin('webpack-report').use(BundleAnalyzerPlugin, [
          {
            analyzerMode: 'static'
          }
        ])
      }
      ///////// 配置完成  npm run analyze
  },
  /**
   * transpileDependencies配置默认为[], babel-loader 会忽略所有 node_modules 中的文件。如果你想要通过 Babel 显式转译一个依赖,可以在这个选项中列出来。配置需要转译的第三方库。
   */
  transpileDependencies:[
    'swiper',
    'dom7',
  ]

};
- 配置
ant-design-vue组件的按需加载, 参考 (opens new window)
npm i --save-dev babel-plugin-import // 安装babel-plugin-import

///// babel.config.js
// 添加
plugins: [
    [
      "import",
      { libraryName: "ant-design-vue", libraryDirectory: "es", style: true } //` style: true `会加载less文件
    ]
  ]

////// src/main.js
import { Button } from 'ant-design-vue';

Vue.use(Button);
- 安装进度条插件
NProgress
npm i nprogress // 安装

/////router/index.js
import NProgress from 'nprogress';
import 'nprogress/nprogress.css';
...

// 路由守卫
router.beforeEach((to, from, next) => {
  NProgress.start();
  next();
});

router.afterEach(() => {
  NProgress.done();
})
- 安装lodash方法库
# babel.config.js配置
- 项目根目录下新建
babel.config.js文件~
所有的
Vue CLI应用都使用@vue/babel-preset-app,它包含了babel-preset-env、JSX支持以及为最小化包体积优化过的配置。
# 其他
配置
.eslintrc.js配置
.gitognore配置
.browserslistrc
上次更新: 1/24/2022, 5:38:42 PM