 阿里云centOS服务器搭建
# 阿里云centOS服务器搭建
# 准备工作
购买阿里云服务器成功后,终端输入我们配置的启动命令,连接上阿里云服务器
➜  ~ ssh root@verney-zhou
Last login: Mon Nov  2 22:12:24 2020 from 222.129.253.230

Welcome to Alibaba Cloud Elastic Compute Service !

[root@iZ2zef9ue9eyhqrvjxs3aqZ ~]# nvm # 连上之后输入nvm提示无此命令,接下来我们开始在这个服务器上安装nvm等相关工具
-bash: nvm: command not found
[root@iZ2zef9ue9eyhqrvjxs3aqZ ~]#
# node.js环境搭建
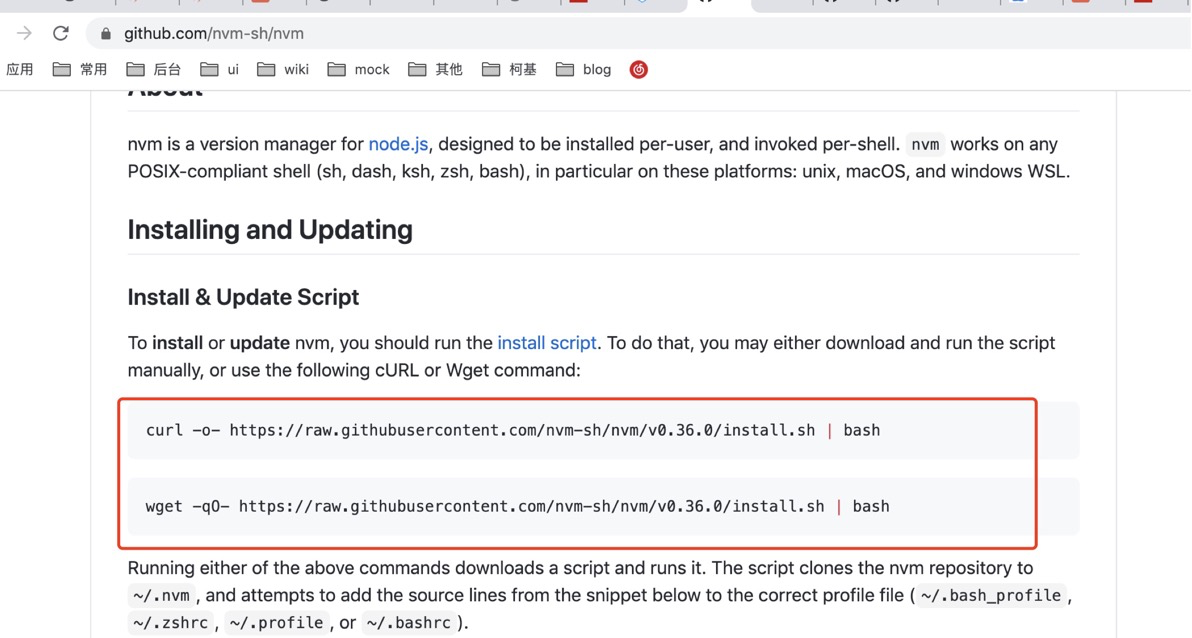
将上面的命令粘贴到终端~
然后就会出现以下下载命令,注意:下载之前记得把switchHost上的本地代理关闭!
[root@iZ2zef9ue9eyhqrvjxs3aqZ ~]# curl -o- https://raw.githubusercontent.com/nvm-sh/nvm/v0.36.0/install.sh | bash
  % Total    % Received % Xferd  Average Speed   Time    Time     Time  Current
                                 Dload  Upload   Total   Spent    Left  Speed
100 13527  100 13527    0     0   1683      0  0:00:08  0:00:08 --:--:--  1155
=> Downloading nvm as script to '/root/.nvm'

=> Appending nvm source string to /root/.bashrc
=> Appending bash_completion source string to /root/.bashrc
=> Close and reopen your terminal to start using nvm or run the following to use it now:

export NVM_DIR="$HOME/.nvm"
[ -s "$NVM_DIR/nvm.sh" ] && \. "$NVM_DIR/nvm.sh"  # This loads nvm
[ -s "$NVM_DIR/bash_completion" ] && \. "$NVM_DIR/bash_completion"  # This loads nvm bash_completion
[root@iZ2zef9ue9eyhqrvjxs3aqZ ~]# ll .nvm // 可查看是否安装成功
总用量 128
-rw-r--r-- 1 root root   2122 11月  2 22:29 bash_completion
-rwxr-xr-x 1 root root    344 11月  2 22:29 nvm-exec
-rw-r--r-- 1 root root 120806 11月  2 22:29 nvm.sh

// 此时如果输入nvm还是会提示nvm: command not found
// 上面安装nvm提示生成了一个.bashrc文件:
[root@iZ2zef9ue9eyhqrvjxs3aqZ ~]# nvm
-bash: nvm: command not found
[root@iZ2zef9ue9eyhqrvjxs3aqZ ~]# ll .bashrc // 查看下是否存在
-rw-r--r--. 1 root root 373 11月  2 22:29 .bashrc
[root@iZ2zef9ue9eyhqrvjxs3aqZ ~]# vim .bashrc // 查看该文件是否包含nvm环境变量
[root@iZ2zef9ue9eyhqrvjxs3aqZ ~]# source .bashrc // 通过source将环境变量生效
[root@iZ2zef9ue9eyhqrvjxs3aqZ ~]# nvm // 再次输入,提示成功

Node Version Manager (v0.36.0)
- 安装node.js
[root@iZ2zef9ue9eyhqrvjxs3aqZ ~]# nvm install node // 安装最新版本的node,
// 如果不行可通过nvm ls-remote 查看可用的版本,再指定版本进行安装
// nvm install 11.3.0 // 安装v11.3.0版本
[root@iZ2zef9ue9eyhqrvjxs3aqZ ~]# nvm install 11.3.0
Downloading and installing node v11.3.0...
Downloading https://nodejs.org/dist/v11.3.0/node-v11.3.0-linux-x64.tar.gz...
######################################################################## 100.0%
Computing checksum with sha256sum
Checksums matched!
Now using node v11.3.0 (npm v6.4.1)
Creating default alias: default -> 11.3.0 (-> v11.3.0)
[root@iZ2zef9ue9eyhqrvjxs3aqZ ~]# node -v // 查看node版本
v11.3.0
[root@iZ2zef9ue9eyhqrvjxs3aqZ ~]# npm -v // 查看npm版本
6.4.1
[root@iZ2zef9ue9eyhqrvjxs3aqZ ~]#
// 安装
[root@iZ2zef9ue9eyhqrvjxs3aqZ ~]# npm install -g cnpm --registry=https://registry.npm.taobao.org
npm WARN deprecated request@2.88.2: request has been deprecated, see https://github.com/request/request/issues/3142
npm WARN deprecated har-validator@5.1.5: this
/root/.nvm/versions/node/v11.3.0/bin/cnpm -> /root/.nvm/versions/node/v11.3.0/lib/node_modules/cnpm/bin/cnpm
+ cnpm@6.1.1
added 688 packages from 971 contributors in 18.074s

[root@iZ2zef9ue9eyhqrvjxs3aqZ ~]# which cnpm // 查看cnpm安装位置,在.nvm下面
/root/.nvm/versions/node/v11.3.0/bin/cnpm
[root@iZ2zef9ue9eyhqrvjxs3aqZ ~]# cnpm -v // 查看版本
cnpm@6.1.1 (/root/.nvm/versions/node/v11.3.0/lib/node_modules/cnpm/lib/parse_argv.js)
npm@6.14.8 (/root/.nvm/versions/node/v11.3.0/lib/node_modules/cnpm/node_modules/npm/lib/npm.js)
node@11.3.0 (/root/.nvm/versions/node/v11.3.0/bin/node)
npminstall@3.28.0 (/root/.nvm/versions/node/v11.3.0/lib/node_modules/cnpm/node_modules/npminstall/lib/index.js)
prefix=/root/.nvm/versions/node/v11.3.0
linux x64 2.6.32-696.16.1.el6.x86_64
registry=https://r.npm.taobao.org
[root@iZ2zef9ue9eyhqrvjxs3aqZ ~]#
# nginx环境搭建
// 在centOs系统中,自带yum安装工具,类似于macOs中的brew
[root@iZ2zef9ue9eyhqrvjxs3aqZ ~]# yum -v
加载 "fastestmirror" 插件
Config time: 0.036
Yum Version: 3.2.29

[root@iZ2zef9ue9eyhqrvjxs3aqZ ~]# yum -y install pcre* // 安装nginx的依赖
[root@iZ2zef9ue9eyhqrvjxs3aqZ ~]# yum -y install openssl* // 安装openssl的依赖

[root@iZ2zef9ue9eyhqrvjxs3aqZ ~]# ll // 查看
总用量 0
[root@iZ2zef9ue9eyhqrvjxs3aqZ ~]# mkdir nginx // 创建文件夹
[root@iZ2zef9ue9eyhqrvjxs3aqZ ~]# cd nginx/
[root@iZ2zef9ue9eyhqrvjxs3aqZ nginx]# wget http://nginx.org/download/nginx-1.12.2.tar.gz // 安装nginx

///////// 安装完成
[root@iZ2zef9ue9eyhqrvjxs3aqZ nginx]# make // 查看make命令是否生效
make: *** 没有指明目标并且找不到 makefile。 停止。
[root@iZ2zef9ue9eyhqrvjxs3aqZ nginx]# gcc // 查看gcc命令是否生效
gcc: 没有输入文件
[root@iZ2zef9ue9eyhqrvjxs3aqZ nginx]# ll // 打开
总用量 960
-rw-r--r-- 1 root root 981687 10月 17 2017 nginx-1.12.2.tar.gz
[root@iZ2zef9ue9eyhqrvjxs3aqZ nginx]# tar -zxvf nginx-1.12.2.tar.gz // 解压


//////// 解压完成
[root@iZ2zef9ue9eyhqrvjxs3aqZ nginx]# ll
总用量 964
drwxr-xr-x 8 1001 1001   4096 10月 17 2017 nginx-1.12.2
-rw-r--r-- 1 root root 981687 10月 17 2017 nginx-1.12.2.tar.gz
[root@iZ2zef9ue9eyhqrvjxs3aqZ nginx]# cd nginx-1.12.2
[root@iZ2zef9ue9eyhqrvjxs3aqZ nginx-1.12.2]# ll

////// 进入到源码目录
总用量 724
drwxr-xr-x 6 1001 1001   4096 11月  3 10:30 auto
-rw-r--r-- 1 1001 1001 278202 10月 17 2017 CHANGES
-rw-r--r-- 1 1001 1001 423948 10月 17 2017 CHANGES.ru
drwxr-xr-x 2 1001 1001   4096 11月  3 10:30 conf
-rwxr-xr-x 1 1001 1001   2481 10月 17 2017 configure  // 可执行文件
drwxr-xr-x 4 1001 1001   4096 11月  3 10:30 contrib
drwxr-xr-x 2 1001 1001   4096 11月  3 10:30 html
-rw-r--r-- 1 1001 1001   1397 10月 17 2017 LICENSE
drwxr-xr-x 2 1001 1001   4096 11月  3 10:30 man
-rw-r--r-- 1 1001 1001     49 10月 17 2017 README
drwxr-xr-x 9 1001 1001   4096 11月  3 10:30 src
[root@iZ2zef9ue9eyhqrvjxs3aqZ nginx-1.12.2]# ./configure  // 执行configure让配置生效
// 会根据本地环境生成配置文件
Configuration summary
  + using system PCRE library
  + OpenSSL library is not used
  + using system zlib library

  nginx path prefix: "/usr/local/nginx"
  nginx binary file: "/usr/local/nginx/sbin/nginx"
  nginx modules path: "/usr/local/nginx/modules"
  nginx configuration prefix: "/usr/local/nginx/conf"
  nginx configuration file: "/usr/local/nginx/conf/nginx.conf"
  nginx pid file: "/usr/local/nginx/logs/nginx.pid"
  nginx error log file: "/usr/local/nginx/logs/error.log"
  nginx http access log file: "/usr/local/nginx/logs/access.log"
  nginx http client request body temporary files: "client_body_temp"
  nginx http proxy temporary files: "proxy_temp"
  nginx http fastcgi temporary files: "fastcgi_temp"
  nginx http uwsgi temporary files: "uwsgi_temp"
  nginx http scgi temporary files: "scgi_temp"

[root@iZ2zef9ue9eyhqrvjxs3aqZ nginx-1.12.2]# make -j4 // 通过make指令对源码进行编译
[root@iZ2zef9ue9eyhqrvjxs3aqZ nginx-1.12.2]# make install // 安装
[root@iZ2zef9ue9eyhqrvjxs3aqZ ~]# /usr/local/nginx/sbin/nginx -t // 查看是否已安装,并通过-t读取配置文件
nginx: the configuration file /usr/local/nginx/conf/nginx.conf syntax is ok
nginx: configuration file /usr/local/nginx/conf/nginx.conf test is successful
[root@iZ2zef9ue9eyhqrvjxs3aqZ ~]# nginx // 但输入nginx命令还无法直接使用
-bash: nginx: command not found

// /usr/bin目录下所有指令都是可以直接访问的
// 可在该目录下创建软连接:ln -s 路径 指令
[root@iZ2zef9ue9eyhqrvjxs3aqZ ~]# cd /usr/bin/     // 打开/usr/bin目录
[root@iZ2zef9ue9eyhqrvjxs3aqZ bin]# ln -s /usr/local/nginx/sbin/nginx nginx  // 创建软连接
[root@iZ2zef9ue9eyhqrvjxs3aqZ bin]# ll nginx // 查看
// 可发现nginx软连接创建成功
lrwxrwxrwx 1 root root 27 11月  3 13:47 nginx -> /usr/local/nginx/sbin/nginx

[root@iZ2zef9ue9eyhqrvjxs3aqZ bin]# cd
[root@iZ2zef9ue9eyhqrvjxs3aqZ ~]# pwd
/root
[root@iZ2zef9ue9eyhqrvjxs3aqZ ~]# nginx // 启动nginx
[root@iZ2zef9ue9eyhqrvjxs3aqZ ~]# ps -ef|grep nginx // 查看进程,发现启动成功
root     17533     1  0 13:53 ?        00:00:00 nginx: master process nginx
nobody   17534 17533  0 13:53 ?        00:00:00 nginx: worker process
root     17540 17327  0 13:53 pts/0    00:00:00 grep nginx
[root@iZ2zef9ue9eyhqrvjxs3aqZ ~]#
- 查看配置文件,访问nginx:
[root@iZ2zef9ue9eyhqrvjxs3aqZ ~]# vim /usr/local/nginx/conf/nginx.conf // 打开配置文件
/////
...
server {
listen 80; // 默认访问80端口
server_name localhost;
#charset koi8-r;
#access_log logs/host.access.log main;
location / { // 默认将所有路径都指向root根路径下的html文件
root html;
index index.html index.htm;
}
}
...
///// 进入html文件
[root@iZ2zef9ue9eyhqrvjxs3aqZ conf]# cd ../html
[root@iZ2zef9ue9eyhqrvjxs3aqZ html]# ll // 查看
总用量 8
-rw-r--r-- 1 root root 537 11月 3 10:38 50x.html
-rw-r--r-- 1 root root 612 11月 3 10:38 index.html // 可发现里面有html文件
// 最后,我们先退出,重新启动服务
[root@iZ2zef9ue9eyhqrvjxs3aqZ ~]# exit // 退出阿里云服务器
logout
Connection to verney-zhou closed.
➜ ~ ping verney-zhou // ping
➜ ~ ssh root@verney-zhou // 连接
Last login: Tue Nov 3 14:09:38 2020 from 103.90.188.234
Welcome to Alibaba Cloud Elastic Compute Service !
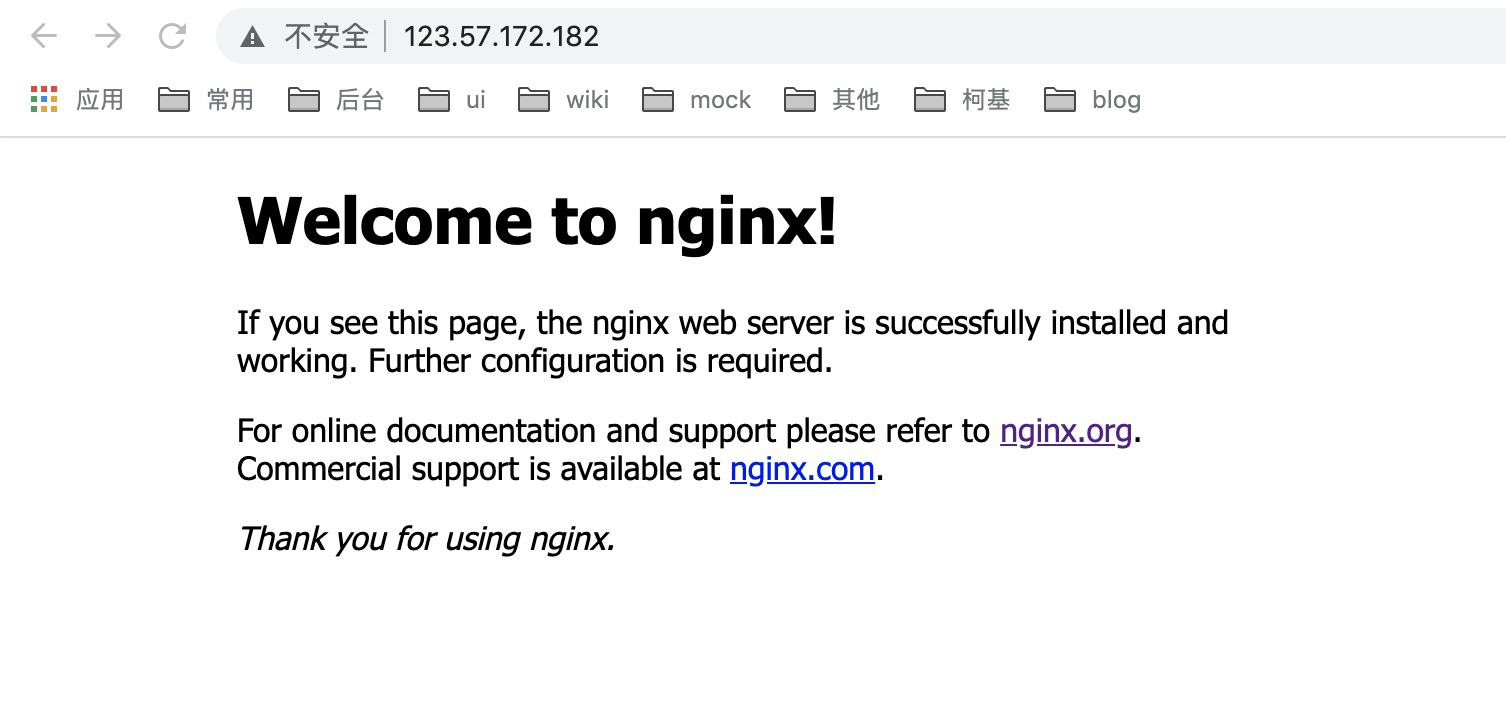
[root@iZ2zef9ue9eyhqrvjxs3aqZ ~]# nginx // 启动nginx服务
浏览器输入购买的阿里云服务器ip地址即可访问了!,如下图:
- 修改配置文件
[root@iZ2zef9ue9eyhqrvjxs3aqZ ~]# cd nginx/
[root@iZ2zef9ue9eyhqrvjxs3aqZ nginx]# touch nginx.conf   // 创建nginx.conf文件
[root@iZ2zef9ue9eyhqrvjxs3aqZ nginx]# vim /usr/local/nginx/conf/nginx.conf    // 打开nginx的主配置文件

/////
// #user  nobody;
user  root;  // 修改为root
worker_processes  1;
....

//  在最后加入这条命令,将/root/nginx/目录下所有以.conf结尾的文件融合到nginx的配置中
//  include /root/nginx/*.conf;

}
/////

[root@iZ2zef9ue9eyhqrvjxs3aqZ nginx]# vim nginx.conf // 添加配置信息
//// http配置如下:
server {
        listen 80;
        // http默认端口号80,这里用了80之后,直接在浏览器输入ip就可以访问了~
        // 最好把/usr/local/nginx/conf/nginx.conf中的端口改成其他,不然会有冲突
        server_name localhost;
        root /root/nginx/upload;
        # autoindex on; //打开索引
        add_header Cache-Control "no-cache,must-revalidate";  // http中添加不进行缓存的配置
        location / { // 所有路由匹配
                add_header Access-Control-Allow-Origin *;  // 添加跨域支持
        }
}


////// https配置:
server {
        listen 443 ssl;
        server_name localhost;
        root /root/nginx/upload;
        # autoindex on; //打开索引
        add_header Cache-Control "no-cache,must-revalidate";  // http中添加不进行缓存的配置
        location / { // 所有路由匹配
                add_header Access-Control-Allow-Origin *;  // 添加跨域支持
        }

         //// 证书密钥:nginx新建https文件夹,将密钥放这里~
          ssl_certificate /root/nginx/https/verneyzhou-code.cn.pem;  // 证书
          ssl_certificate_key /root/nginx/https/verneyzhou-code.cn.key; // 密钥
          ////
          ssl_session_timeout  5m;  // 超时时间 5min
          ssl_protocols  SSLv3 TLSv1;
          ssl_ciphers  ALL:!ADH:!EXPORT56:RC4+RSA:+HIGH:+MEDIUM:+LOW:+SSLv2:+EXP;
          ssl_prefer_server_ciphers  on;
}


/////


//// ESC + :wq退出
[root@iZ2zef9ue9eyhqrvjxs3aqZ nginx]# mkdir upload  // 新建upload文件夹
[root@iZ2zef9ue9eyhqrvjxs3aqZ nginx]# cd upload/
[root@iZ2zef9ue9eyhqrvjxs3aqZ upload]# vim index.html  // 创建index.html文件,并添加内容
//// 内容如下:
<h2>hello wolrd!!!</h2>
////
[root@iZ2zef9ue9eyhqrvjxs3aqZ upload]# nginx -t  // 检查配置是否报错
nginx: the configuration file /usr/local/nginx/conf/nginx.conf syntax is ok
nginx: configuration file /usr/local/nginx/conf/nginx.conf test is successful
[root@iZ2zef9ue9eyhqrvjxs3aqZ upload]# nginx -s reload  // 重启一下
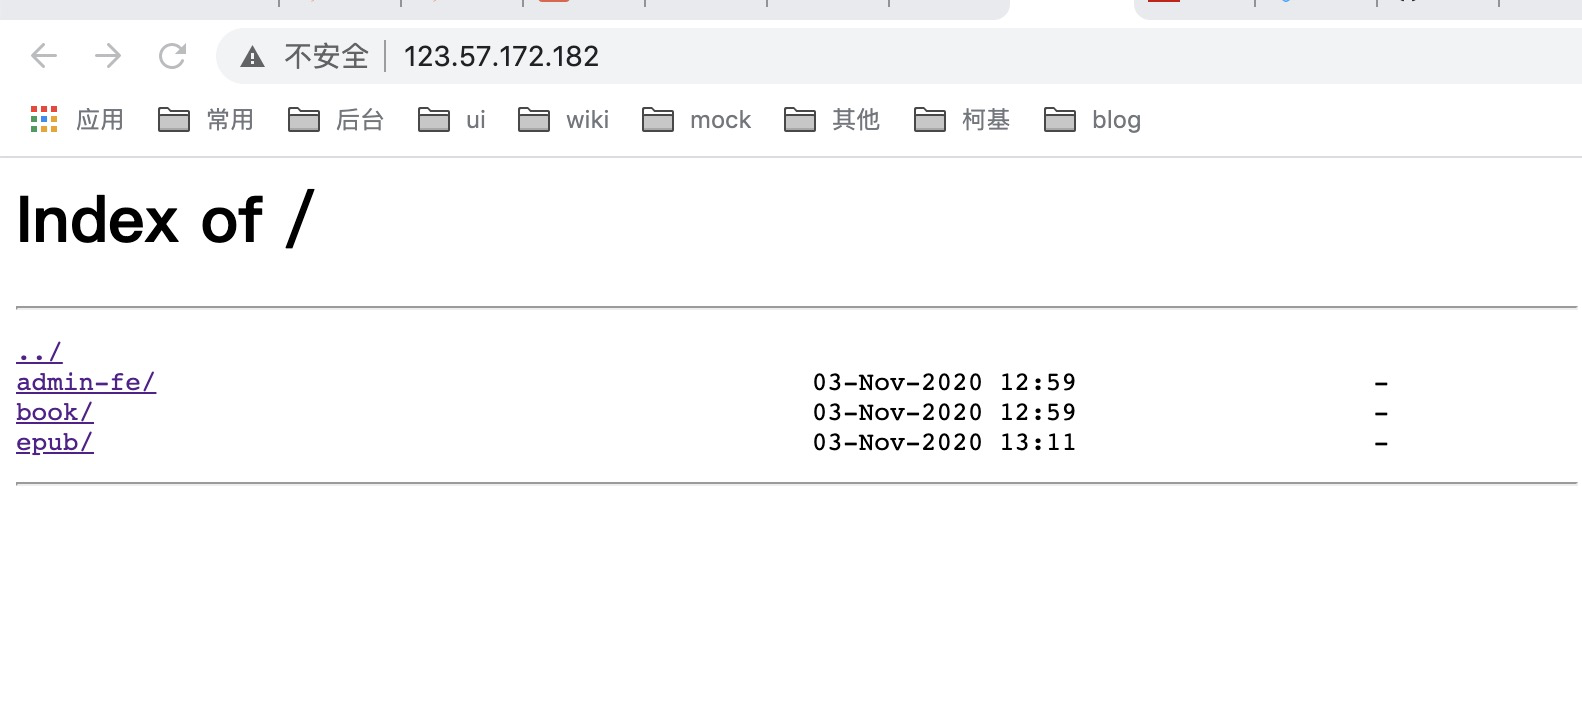
这是再次在浏览器中输入阿里云ip,就会出现如下内容:
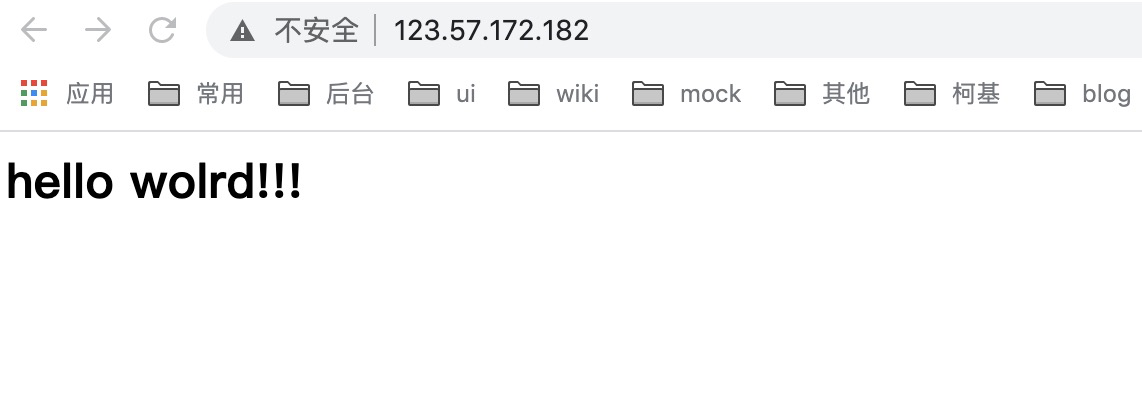
已经能够访问到我们自己配置的资源~
# FileZilla上传静态资源
上传资源到nginx上~
首先下载FTP工具:FileZilla (opens new window)
下载完成后,打开FileZilla:
- 文件 > 站点管理器 > 新建站点:
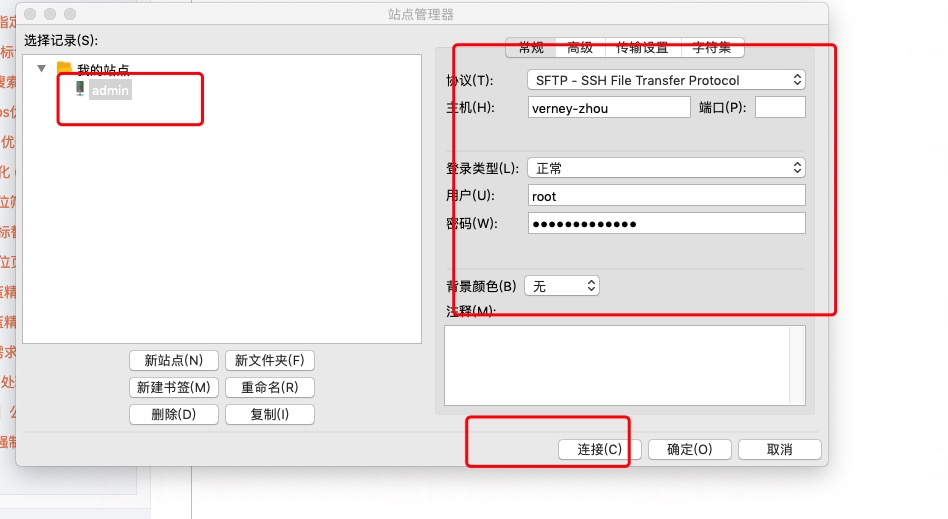
站点名自定义,主机是ssh登录服务器的别名,密码是服务器的密码~
- 连接成功之后:
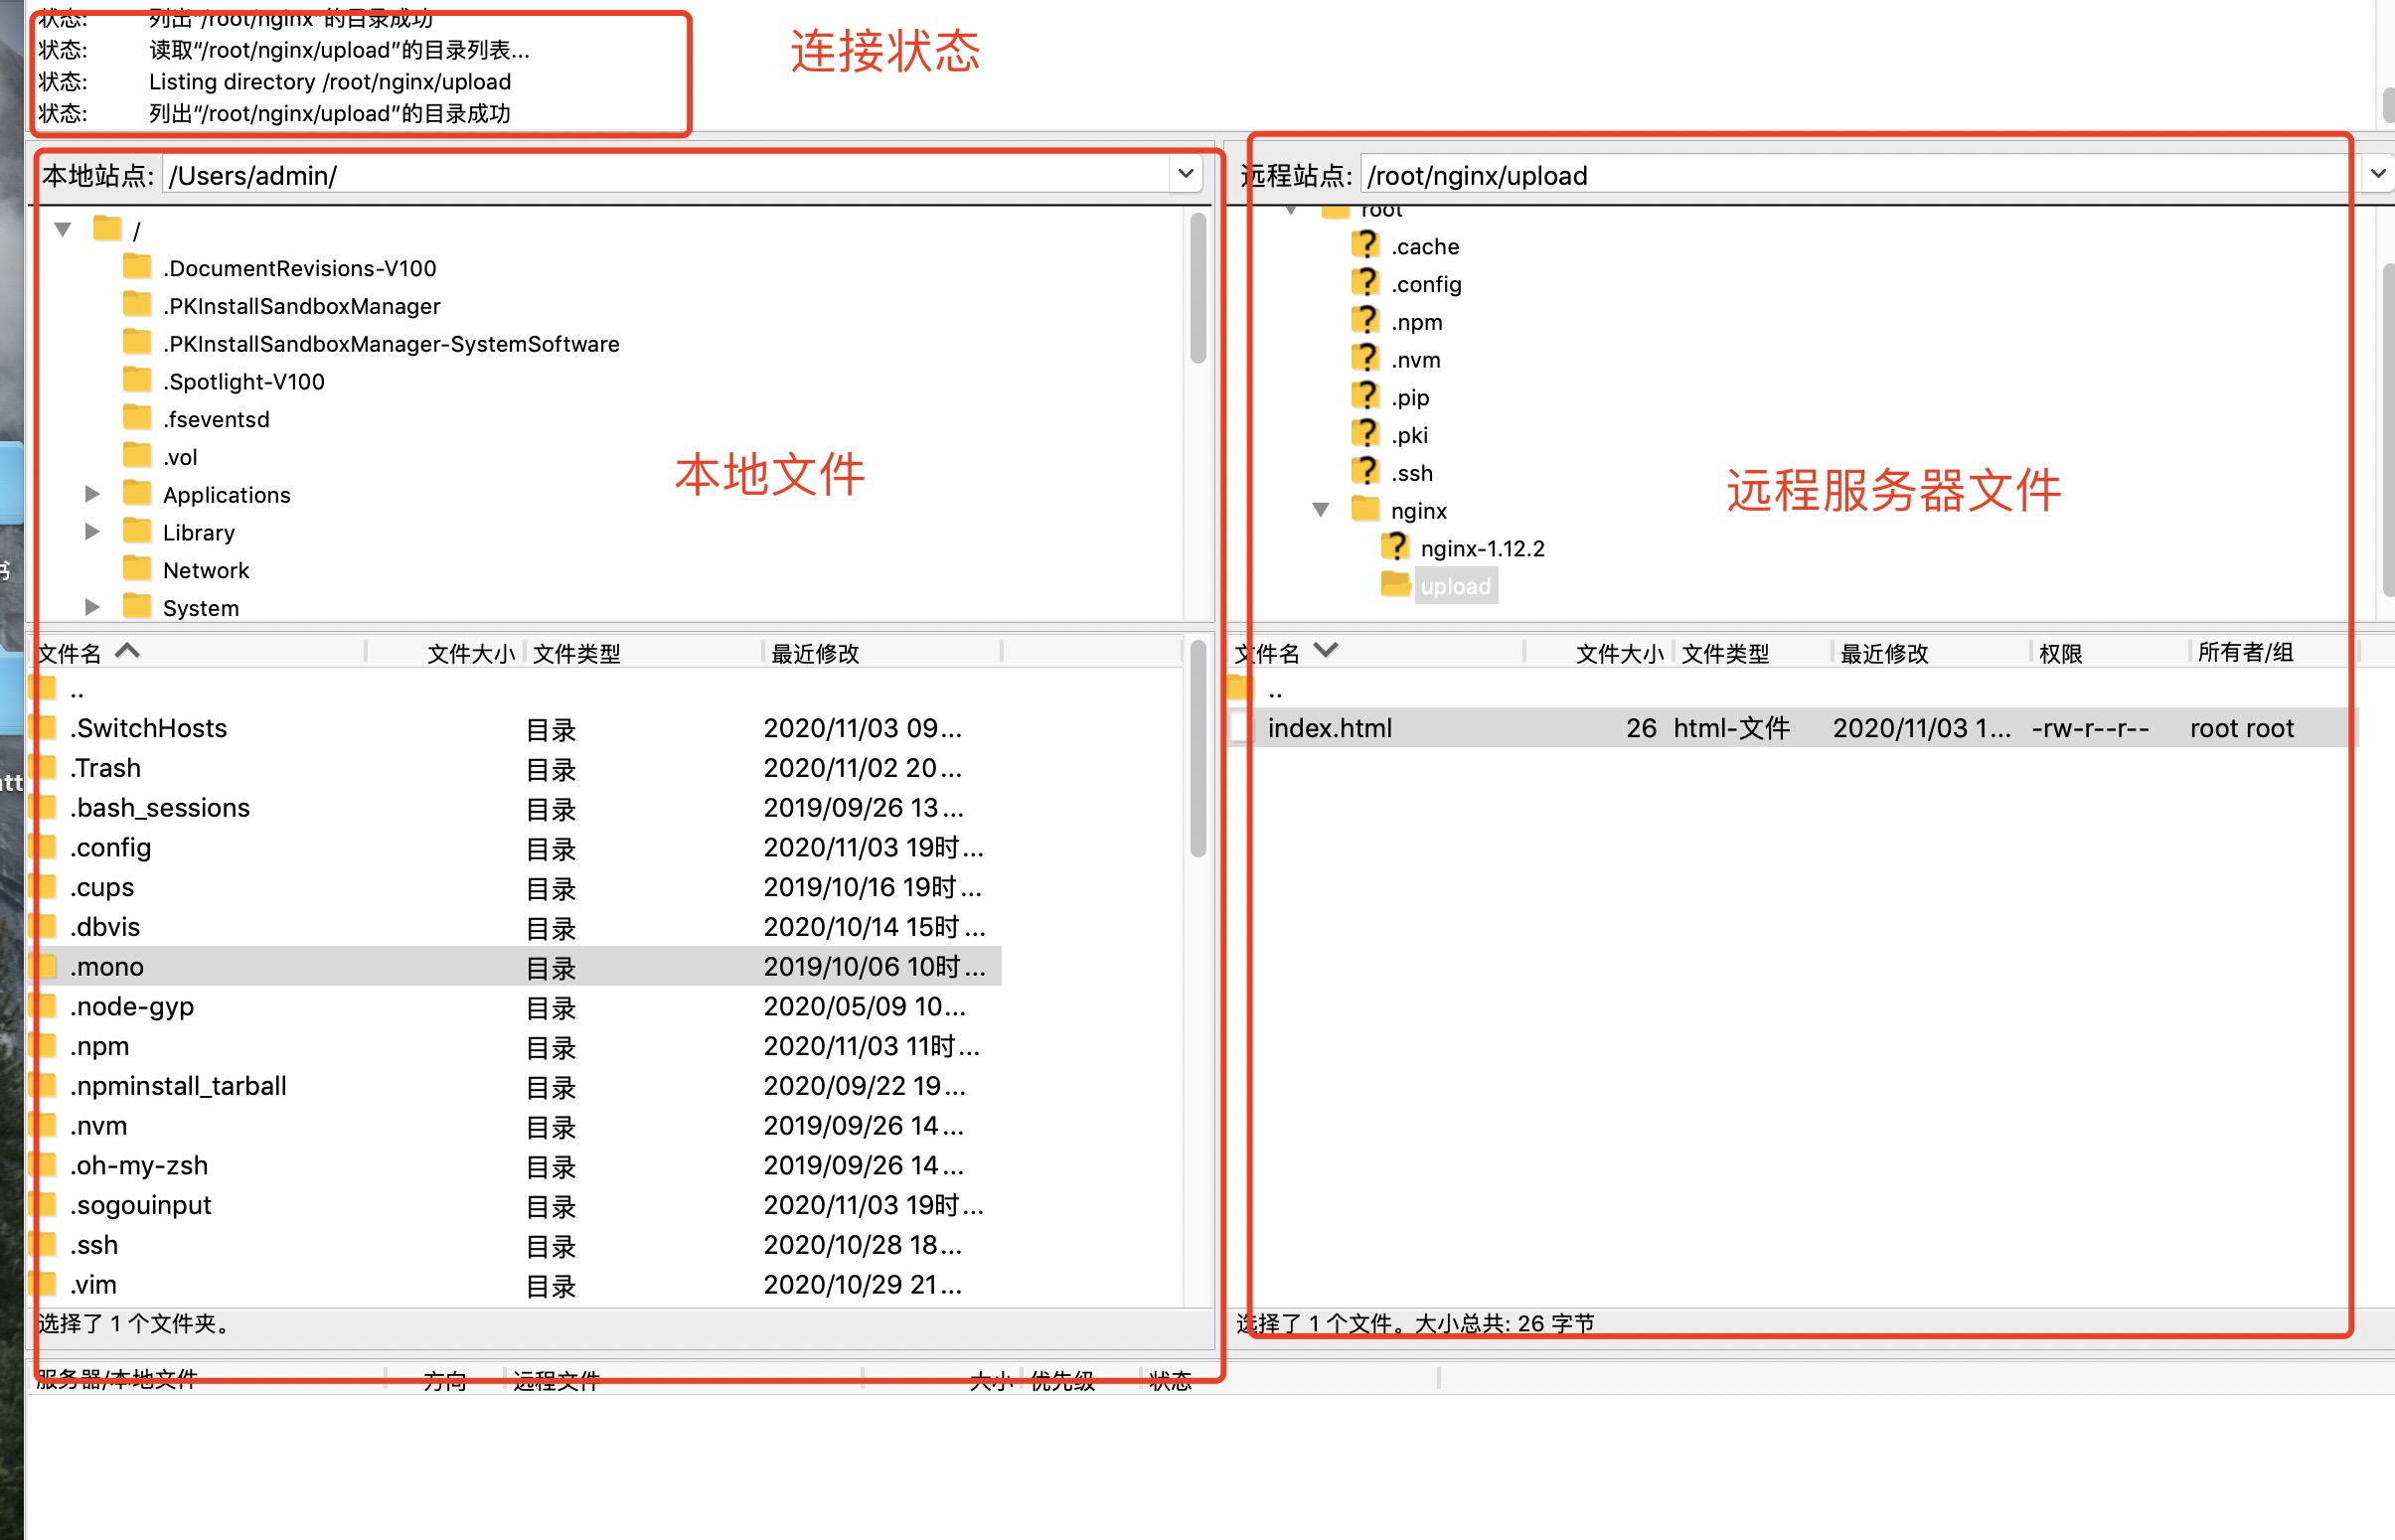
- 文件 > 站点管理器 > 新建站点:
然后将本地需要上传到服务器的资源直接拖拽到右边区域,就可以实现上传了~
上传成功后,删除刚开始的测试文件index.html,刷新浏览器ip地址:
本地资源已经上传到服务器上了~
- 最后,如果上线的话,记得把nginx中自动打开index的配置关闭:
[root@iZ2zef9ue9eyhqrvjxs3aqZ ~]# vim nginx/nginx.conf
////
# autoindex off; // 关闭
///
// 这样如果直接输入ip地址不会打开页面,只有输入准确url才能访问~
# git部署+免密更新
[root@iZ2zef9ue9eyhqrvjxs3aqZ ~]# git
-bash: git: command not found
[root@iZ2zef9ue9eyhqrvjxs3aqZ ~]# yum install -y git // 安装git
[root@iZ2zef9ue9eyhqrvjxs3aqZ admin-book]# git version // 查看版本
git version 1.7.1
[root@iZ2zef9ue9eyhqrvjxs3aqZ admin-book]# yum remove git // 版本太低,卸载掉
// 手动安装最新版本,首先安装各种依赖
[root@iZ2zef9ue9eyhqrvjxs3aqZ admin-book]# yum install -y curl-devel expat-devel gettext-devel openssl-devel zlib-devel
[root@iZ2zef9ue9eyhqrvjxs3aqZ admin-book]# yum install -y gcc perl-ExtUtils-MakeMaker
[root@iZ2zef9ue9eyhqrvjxs3aqZ admin-book]# yum install -y tcl build-essential tk gettext
// 安装最新的git版本,下载源码
[root@iZ2zef9ue9eyhqrvjxs3aqZ admin-book]# wget https://github.com/git/git/archive/v2.11.0.tar.gz
// 解压
[root@iZ2zef9ue9eyhqrvjxs3aqZ admin-book]# tar -zxvf v2.11.0.tar.gz
[root@iZ2zef9ue9eyhqrvjxs3aqZ admin-book]# ll
总用量 4880
drwxrwxr-x 18 root root   12288 7月  16 2016 git-2.11.0
-rw-r--r--  1 root root 4978587 11月  3 22:21 v2.11.0.tar.gz
[root@iZ2zef9ue9eyhqrvjxs3aqZ admin-book]# cd git-2.11.0/
// 编译 指定安装后的可执行文件位于此目录
[root@iZ2zef9ue9eyhqrvjxs3aqZ git-2.11.0]# make prefix=/usr/local/git all
// 安装
[root@iZ2zef9ue9eyhqrvjxs3aqZ git-2.11.0]# make prefix=/usr/local/git install
// 打开/usr/local/文件夹 查看是否安装成功
[root@iZ2zef9ue9eyhqrvjxs3aqZ local]# cd /usr/local/
[root@iZ2zef9ue9eyhqrvjxs3aqZ local]# ls // 里面有 git 说明安装成功
aegis  bin  etc  games  git  include  lib  lib64  libexec  nginx  sbin  share  src
// /usr/bin/下面添加软连接
[root@iZ2zef9ue9eyhqrvjxs3aqZ local]# cd /usr/bin/
[root@iZ2zef9ue9eyhqrvjxs3aqZ bin]# ln -s /usr/local/git/bin/git git
// 成功之后,直接输入 git 不再提示'command not found'则表示创建命令成功
[root@iZ2zef9ue9eyhqrvjxs3aqZ bin]# git

// 进入admin-book/目录,开始clone github上的代码~
[root@iZ2zef9ue9eyhqrvjxs3aqZ admin-book]# git clone https://github.com/verneyZhou/ebook-admin-vue.git
[root@iZ2zef9ue9eyhqrvjxs3aqZ admin-book]# git clone https://github.com/verneyZhou/ebook-admin-node.git
# mySql环境安装
- 安装
// 安装
[root@iZ2zef9ue9eyhqrvjxs3aqZ ~]# yum -y install mysql-server

[root@iZ2zef9ue9eyhqrvjxs3aqZ ~]# service mysqld status // 检查mysql启动状态
mysqld is stopped
[root@iZ2zef9ue9eyhqrvjxs3aqZ ~]# service mysqld restart // 重启mysql

// 根据提示,重置密码
[root@iZ2zef9ue9eyhqrvjxs3aqZ log]# /usr/bin/mysqladmin -u root password '2020zyZY' // 2020zyZY为新密码
[root@iZ2zef9ue9eyhqrvjxs3aqZ log]# /usr/bin/mysqladmin -u root -h iZ2zef9ue9eyhqrvjxs3aqZ password '2020zyZY'
// 重置成功,登录
[root@iZ2zef9ue9eyhqrvjxs3aqZ log]# mysql -u root -p
Enter password: // 输入新密码

mysql> // 连接成功 输入:exit 或 ctrl+c 退出
mysql> use mysql; // 使用sql
mysql> create user `root`@`%` identified by '2020zyZY';  // 创建root用户并设置密码为2020zyZY
ERROR 1396 (HY000): Operation CREATE USER failed for 'root'@'%'  // 提示报错,因为已经存在了root用户
mysql> drop user 'root'@'%'; // 先删除
Query OK, 0 rows affected (0.00 sec)

mysql> create user 'root'@'%' identified by '2020zyZY'; // 再重新创建
// create user `root`@`%` identified with mysql_native_password by `2020zyZY`; mysql版本高可用这条命令
Query OK, 0 rows affected (0.00 sec)

mysql> grant all privileges on *.* to 'root'@'%';  // 给root账户赋予所有权限
Query OK, 0 rows affected (0.00 sec)
mysql> flush privileges; // 使权限生效
Query OK, 0 rows affected (0.00 sec)
mysql>
连接
- 添加3306端口:打开阿里云控制台,云服务器ECS,网络安全,安全组,进入点击添加:
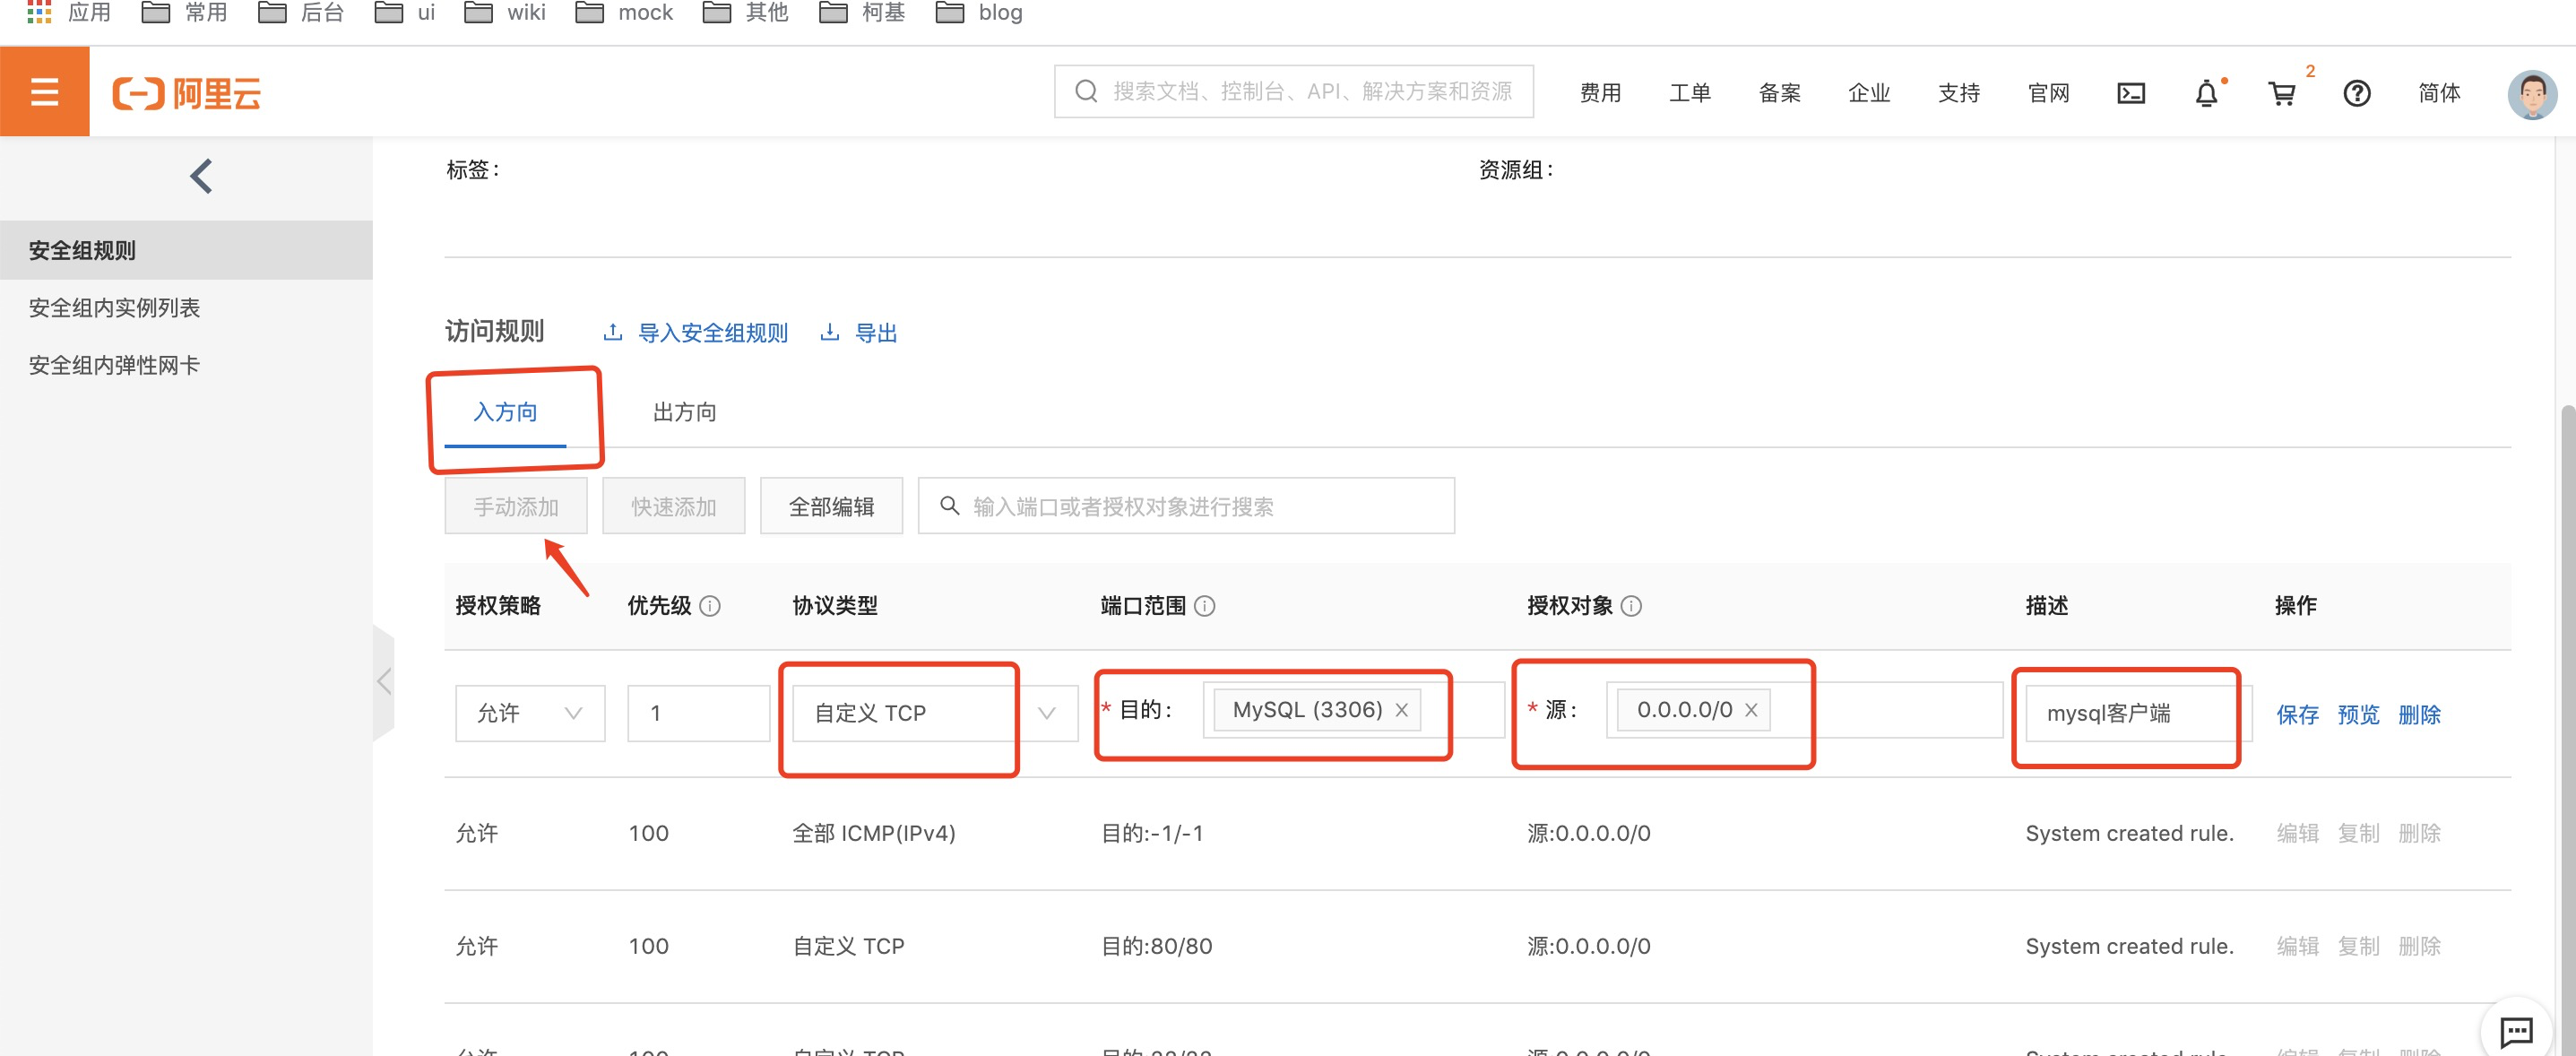
保存之后,客户端就能连到3306端口~
- 打开mysql客户端navicat,新建mySql连接,连接云服务器:
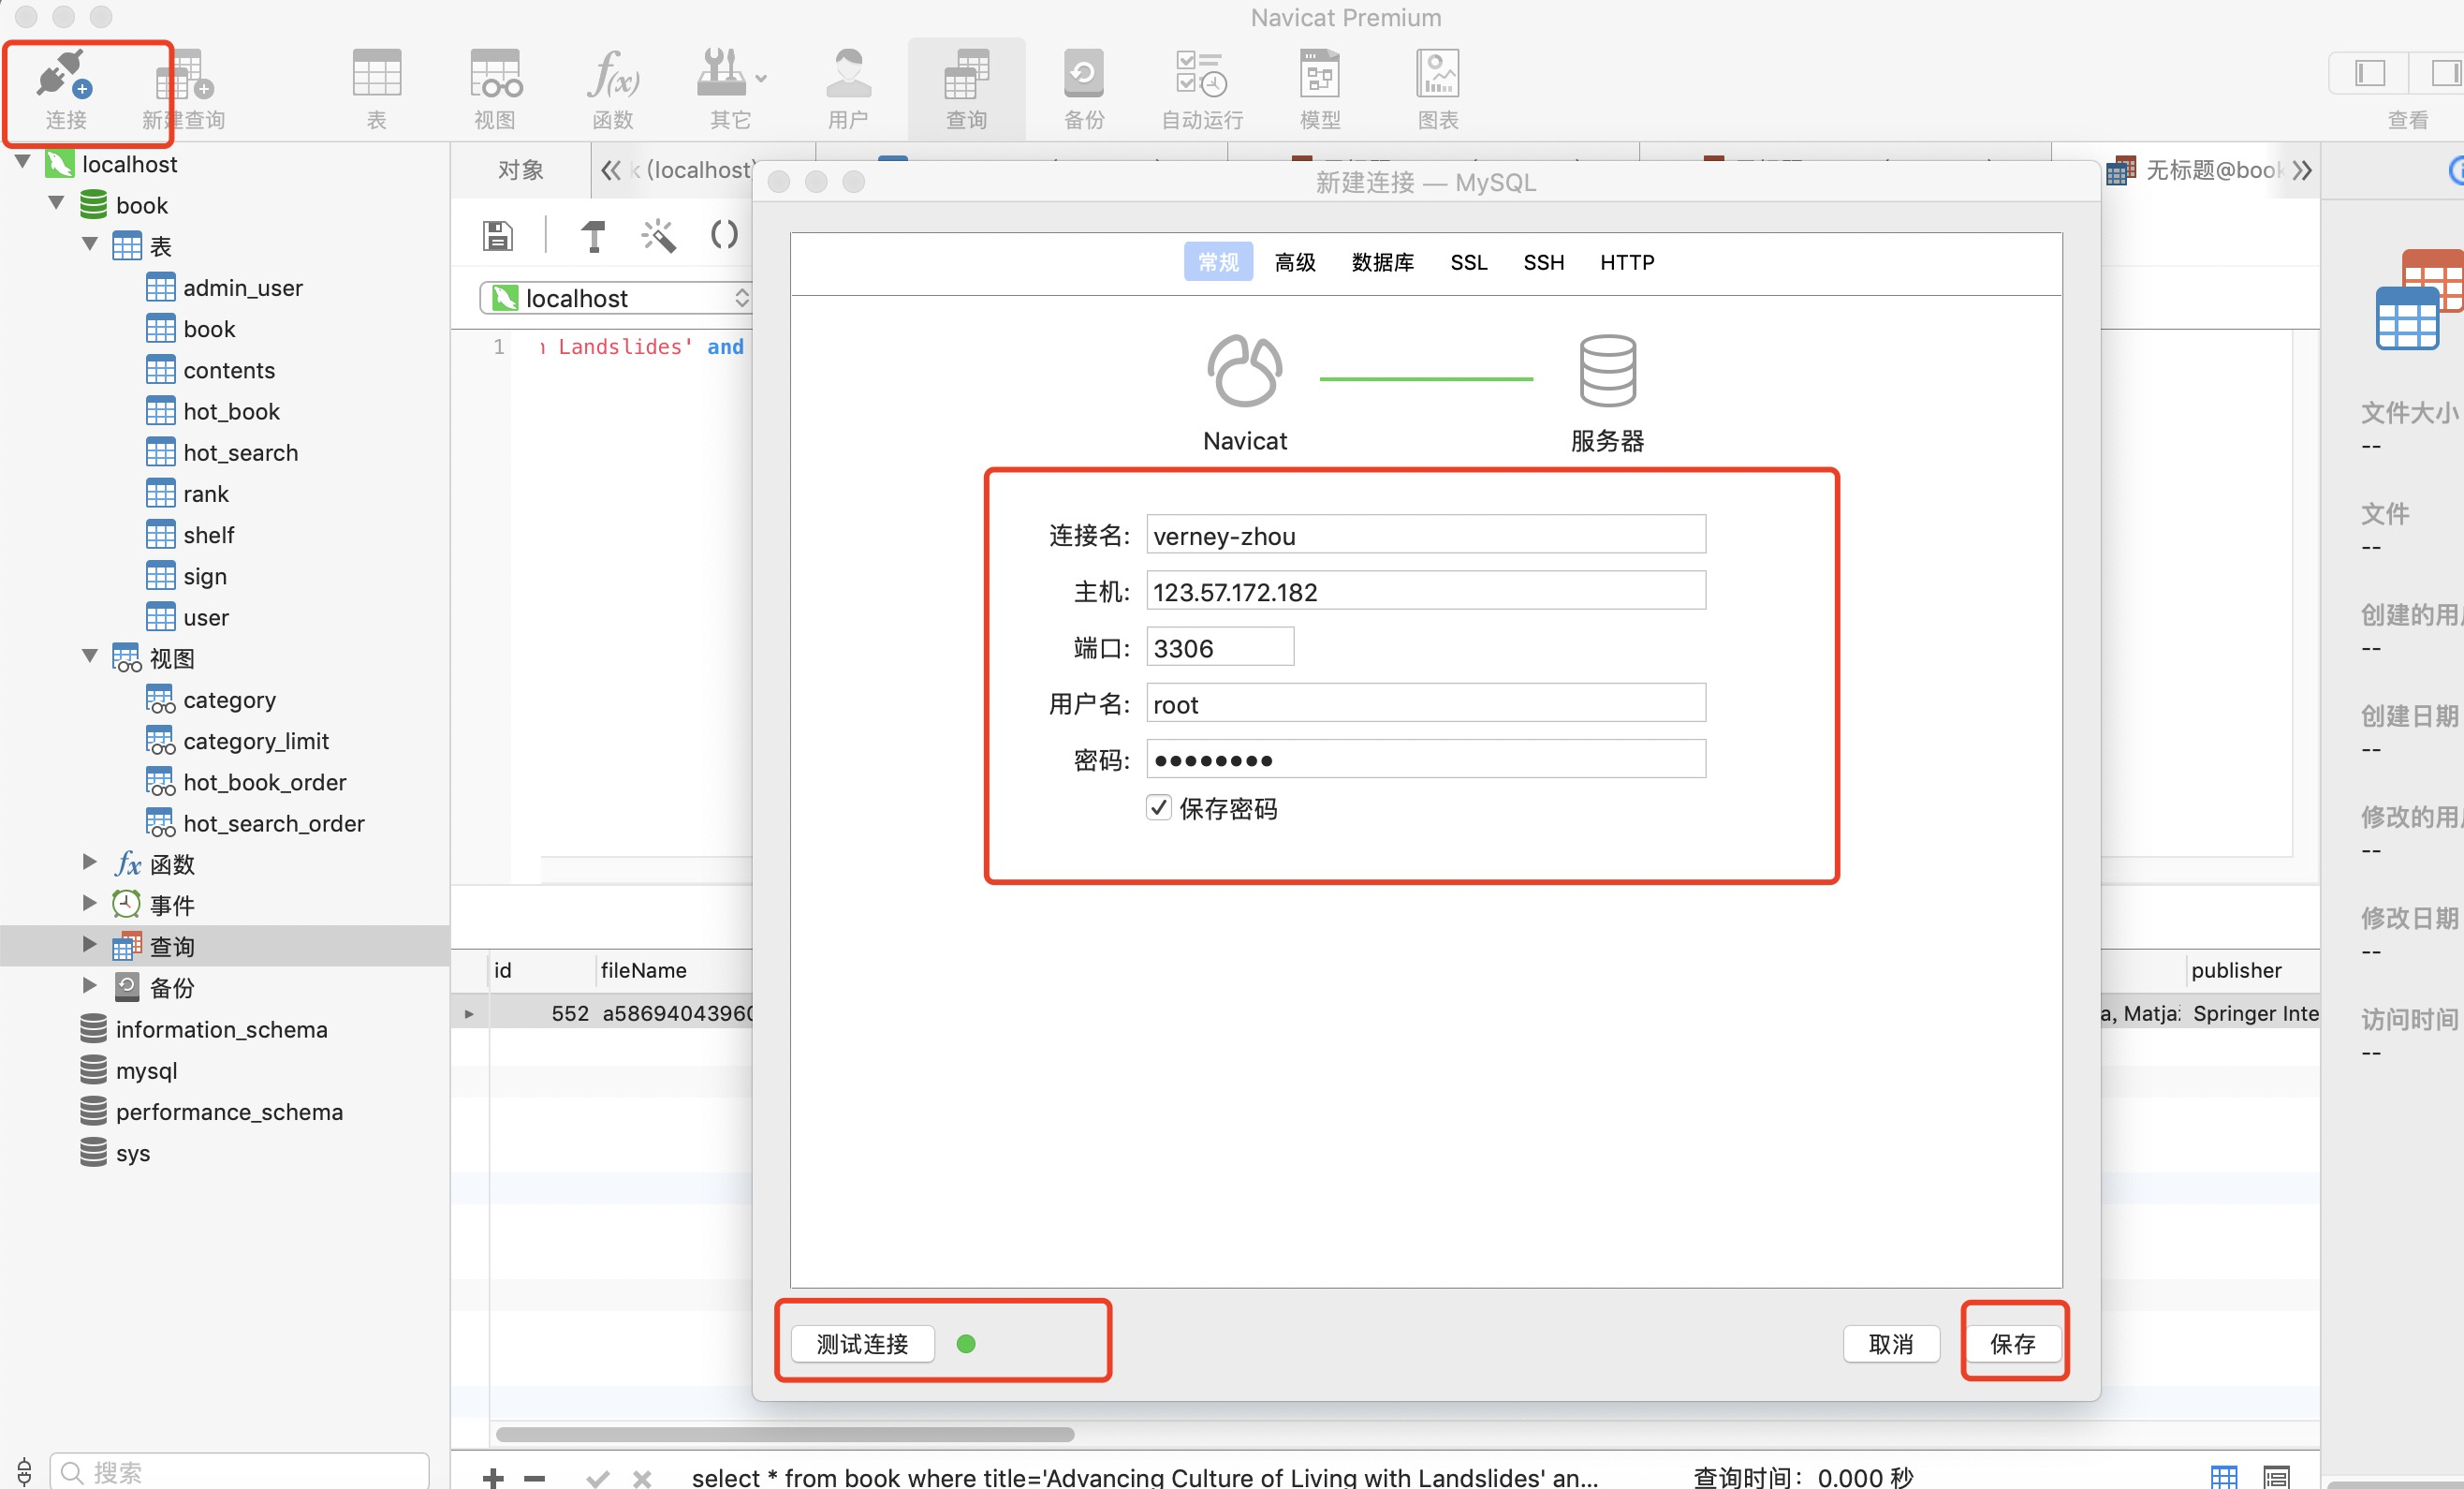
主机为阿里云服务器ip,端口3306,用户名为root,密码为配置的2020zyZY
- 添加3306端口:打开阿里云控制台,云服务器ECS,网络安全,安全组,进入点击添加:
新建站点成功后,连接,并导入数据库book,和之前在本地的操作一样。
通过导出或查询操作添加数据后,可在服务器上查询是否数据是否添加成功:
mysql> show databases;  // 展示数据库
+--------------------+
| Database           |
+--------------------+
| information_schema |
| book               |
| mysql              |
| test               |
+--------------------+
4 rows in set (0.00 sec)

mysql> use book;  // 展示book数据库
Database changed
mysql> show tables; // 展示表格,发现与我们导入的数据符合
+------------------+
| Tables_in_book   |
+------------------+
| admin_user       |
| book             |
| category         |
| category_limit   |
| contents         |
| hot_book         |
| hot_book_order   |
| hot_search       |
| hot_search_order |
| rank             |
| shelf            |
| sign             |
| user             |
+------------------+
13 rows in set (0.00 sec)

mysql> select count(*) from book;  // 查询数据量
+----------+
| count(*) |
+----------+
|      466 |
+----------+
1 row in set (0.00 sec)

mysql>
- mysql数据导入成功后,最后需要在后端代码中修改环境配置:
// db/config.js

const env = require('../utils/env');

let host,user,password;

if (env === 'env') { // 开发环境  本地mysql
  host = 'localhost';
  user = 'root';
  password = '*******';
} else { // 线上环境  阿里云服务器mysql
  host = '123.57.172.182';
  user = 'root';
  password = '*******'
}

module.exports = {
    host, // 数据库主机的ip地址或域名
    user, // 用户名
    password, // 密码
    database: 'book' // 数据库
  }
# 常见问题
- nginx.conf中添加https服务后,nginx -t 提示报错:
nginx: [emerg] the "ssl" parameter requires ngx_http_ssl_module in /root/nginx/nginx.conf:16
nginx: configuration file /usr/local/nginx/conf/nginx.conf test failed
原因也很简单,nginx缺少http_ssl_module模块,编译安装的时候带上--with-http_ssl_module配置就行了;具体参考 (opens new window)
// 先删除nginx.conf中https部分的配置,nginx -s stop 停止nginx服务~
[root@iZ2zef9ue9eyhqrvjxs3aqZ ~]# cd /root/nginx/nginx-1.12.2  // 打开
[root@iZ2zef9ue9eyhqrvjxs3aqZ nginx-1.12.2]# ls
auto  CHANGES  CHANGES.ru  conf  configure  contrib  html  LICENSE  Makefile  man  objs  README  src
// 编译
[root@iZ2zef9ue9eyhqrvjxs3aqZ nginx-1.12.2]# ./configure --prefix=/usr/local/nginx --with-http_stub_status_module --with-http_ssl_module
// 运行
[root@iZ2zef9ue9eyhqrvjxs3aqZ nginx-1.12.2]# make
// 备份已安装好nginx,提示输入:yes
[root@iZ2zef9ue9eyhqrvjxs3aqZ nginx-1.12.2]# cp /usr/local/nginx/sbin/nginx /usr/local/nginx/sbin/nginx.bak
[root@iZ2zef9ue9eyhqrvjxs3aqZ ~]# cd /root/nginx/nginx-1.12.2  // 打开
// 将编译好的nginx覆盖掉原有的nginx,提示输入:yes
[root@iZ2zef9ue9eyhqrvjxs3aqZ ~]# cp ./objs/nginx /usr/local/nginx/sbin/

[root@iZ2zef9ue9eyhqrvjxs3aqZ ~]# cd /usr/local/nginx/sbin/ // 再次进入安装目录
[root@iZ2zef9ue9eyhqrvjxs3aqZ ~]# ./nginx -V  // 查看版本
nginx version: nginx/1.12.2
built by gcc 4.4.7 20120313 (Red Hat 4.4.7-23) (GCC)
built with OpenSSL 1.0.1e-fips 11 Feb 2013
TLS SNI support enabled
// 如此显示则表示安装成功
configure arguments: --prefix=/usr/local/nginx --with-http_stub_status_module --with-http_ssl_module
// 重新添加https配置,重启nginx即可~
[root@iZ2zef9ue9eyhqrvjxs3aqZ sbin]# vim /root/nginx/nginx.conf
- mysql启动时报错:
mysql> create user `root`@`%` identified by '2020zyZY';  // 创建root用户并设置密码为2020zyZY
ERROR 1396 (HY000): Operation CREATE USER failed for 'root'@'%'  // 提示报错,因为已经存在了root用户

// 解:
mysql> drop user 'root'@'%'; // 先删除
Query OK, 0 rows affected (0.00 sec)

mysql> create user 'root'@'%' identified by '2020zyZY'; // 再重新创建
// create user `root`@`%` identified with mysql_native_password by `2020zyZY`; mysql版本高可用这条命令
mysql> grant all privileges on *.* to 'root'@'%';  // 给root账户赋予所有权限
- mysql -u root -p登录mysql时报错;具体参考 (opens new window)
ERROR 1045 (28000): Access denied for user 'root'@'localhost' (using password: YES) // 权限受限

// 解:
// ctrl+c退出mysql服务
[root@iZ2zef9ue9eyhqrvjxs3aqZ ~]# service mysqld stop  // 退出mysql
[root@iZ2zef9ue9eyhqrvjxs3aqZ ~]# vim /etc/my.cnf  // 编辑my.cnf文件

//////// /etc/my.cnf
[mysqld]
datadir=/var/lib/mysql
socket=/var/lib/mysql/mysql.sock
user=mysql
# Disabling symbolic-links is recommended to prevent assorted security risks
symbolic-links=0
skip-grant-tables  // 这里增加一行代码,用来跳过密码验证的过程

[mysqld_safe]
log-error=/var/log/mysqld.log
pid-file=/var/run/mysqld/mysqld.pid
/////

[root@iZ2zef9ue9eyhqrvjxs3aqZ ~]# service mysqld restart // 重启
Stopping mysqld:                                           [  OK  ]
Starting mysqld:                                           [  OK  ]
[root@iZ2zef9ue9eyhqrvjxs3aqZ ~]# mysql -u root -p // 登录,输入密码的时候直接回车跳过,显示登录成功
mysql> use mysql;  // 使用
mysql> show database; // 显示数据库
mysql> update user set password=password("2020zyZY") where user="root";  // 更改密码
mysql> flush privileges;  // 生效
mysql> grant all privileges on *.* to 'root'@'%';  // 赋予root最高权限
- 新建数据库的时候报错:
1044 - Access denied for user 'root'@'%' to database 'book'
应该是root账号没有授权,在终端连上服务器后,给root授权,具体参照1.安装的授权流程~
Back上次更新: 1/24/2022, 5:38:42 PM